- Synchronization time adjustment
We can adjust time according to different material and thread. But when do we need to adjust and how to adjust? Let’s first see some standard adjustments.
- Adjustment of synchronization of looper swings left and right
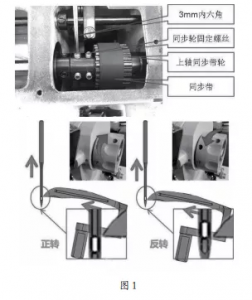
Choose a reference point each on the looper and needle – usually we can choose the looper hole and needle hole – As the below picture shows, adjust the upper timing wheel to make the difference to be just as big as one hole for forwarding and reversing of the machine. We need to loose the 6 fasten screws of the timing wheel, keep the timing wheel still and roll the hand wheel to adjust the synchronization.
- Adjustment of synchronization of looper back and forth movement.
The looper is moving forward while moving left, we can make the adjustment according to the curve lines on the cam. Check the picture NO. 2.

Synchronous adjustment instructions:
A. The movement of needle bar would be quicker while the looper move slower. That will make the thread loop bigger than normal, thus there won’t be stitch-skipping for the right needle.
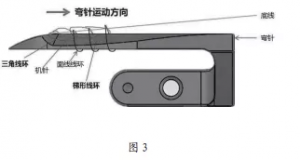
B. When the looper move faster(remember don’t faster than the needle bar), the needle movement will be slower. Thick material will make it difficult for the left needle to insert into the triangle loop. Thus the stitch skipping happens. Check the picture NO.3
- Adjustment of looper position
- As the picture NO.4 shows. We need to make the distance of the tip of looper and the right needle to be 2.5-3 mm when the looper moves to the rightmost position.

- Level the needle clamp to make the looper tip right next to but not squeezed to the middle needle face when the looper tip meets the middle needle.
- Roll the hand wheel according to the machine direction. Adjust the height of the needle bar according to the position of the needle tip and needle hole when the looper meets the middle needle. The height is about 1.5-2 mm as the picture NO. 5 shows.

- Keep the overlapping less than 1/3 of the needle bar and looper while the needle bar is going down. As we can see from the picture NO.3. There are three thread loops on the looper. And the left one is smallest and triangle type and that makes it difficult to be inserted. Please note that too much overlapping will hurt the needle tip while little overlapping leads to stitch skipping. So we need to control the position adjustment. Check the below picture NO.6

Tip. We can control the back and forth movement of the looper to adjust the overlapping of needle bar and looper.
3 Adjustment of time and position for needle guard
- The needle guard just stops backward and meets the tip of the middle needle when the looper tip meets the middle needle. Check the picture NO.7.
- We can choose the right point to adjust when the second screw of needle guard cam meets the second screw of balance block of the lower shaft as the picture NO. Shows.

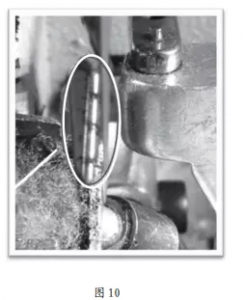
- The bottom of the right needle hole need to be align with the bevel ridge of the needle guard as the picture NO. 9 shows.
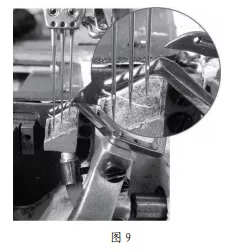
- Tips for adjustment of needle guard. Push the right needle, guard the middle needle and empty the left needle. The needle guard would push the thread loop aside and leads to stitch skipping if it is too near to the needles. As we all know that the thread loop on the left needle is the biggest one.
4 Adjustment of wire cam position
- The wire cam starts to push the thread when the needle bar arrives at
the highest position or the looper arrives at the leftmost position.
- The wire cam starts to loose thread while the left needle tip arrives at the upper back of the looper. We can learn from the picture NO.2 that common side thread of parallel thread loops will get twisted if the thread looses too fast. And that will easily leads to stitch skipping.
- We may need to adjust the thread guide at the same time of adjusting the thread cam if necessary.
- The bottom line of the finished product will be loosen if the wire cam withdraws too quickly. And there will be stitch skipping if the wire cam withdraws too slowly.
